Friday, 10 August 2018

Hacking Cisco Linksys EA2700


Step 1: taking apart
Note there are three screws to take off.


Step 2: Hook up UART Serial debugger


Step 3:
screen /dev/ttyUSB0 115200


ref:
https://forum.dd-wrt.com/phpBB2/viewtopic.php?t=276769&sid=6a27f6c98e93a870f25587ca2236a2f3
https://forum.dd-wrt.com/phpBB2/viewtopic.php?p=989071&sid=48bddfccb6ab58c28bb44fc91b9b9ca7
https://forum.dd-wrt.com/phpBB2/viewtopic.php?t=51486
https://forum.dd-wrt.com/phpBB2/viewtopic.php?p=773996


Wednesday, 8 August 2018

Tinkering OpenWRT (10) : WiFi Configuration Again

I don't know why my AS9331 board couldn't even ping 192.168.1.1 and I'm getting the following error:
        pingsendto:Network is unreachable

Step 1:

Updated my /etc/config/wireless and /etc/config/network as shown below.

/etc/config/wireless
config wifi-device 'radio0'
        option type 'mac80211'
        option hwmode '11g'
        option path 'platform/ar933x_wmac'
        option htmode 'HT40'
        #option disabled '0'   #REMOVE THIS LINE TO ENABLE WIFI:
        option channel '1'
        option txpower '30'
        option country 'US'

config wifi-iface
        option network 'wan0'
        option ssid 'FIDO_NETWORK'
        option encryption 'psk2'
        option device 'radio0'
        option mode 'sta'
        option bssid 'B8:4C:3F:F:62:68'
        option key '12345678'

config wifi-iface
        option  device  radio0
        option  network lan
        option  mode    ap
        option  ssid    OpenWrt
        option  encryption none

###############################################

/etc/config/network
config switch 'eth1'
        option reset '0'
        option enable_vlan '0'

config interface 'loopback'
        option ifname 'lo'
        option proto 'static'
        option ipaddr '127.0.0.1'
        option netmask '255.0.0.0'

config interface 'lan'
        option ifname 'eth1'
        option proto 'static'
        option ipaddr '192.168.1.1'           # this has to be your router addr
        option netmask '255.255.255.0'

config interface 'wan0'
        option ifname 'wlan0'
        option proto 'dhcp'
        option macaddr '00:CA:01:07:23:96'  # this is the mac addr of the board (router)
        #if mac address not provided, it will take a loooong time (~10min) to connect to the wifi

config interface 'wan1'
        option ifname 'eth0'
        option proto 'dhcp'
        option ifname eth0
        option proto dhcp


Step 2:
/sbin/wifi up

#######################################################

For some reason the above stopped working anymore. There must be some problems. For example, 192.168.1.1 cannot be in lan configuration because this ipaddr indicates the ip address when this AR9931 device acts as the AP for other clients to connect. It has to be something else.

Here are my new configurations and it works!!!

Step 1: Factory Reset
$ firstboot

Step 2:
/etc/config/network

config switch 'eth1'
        option reset '0'
        option enable_vlan '0'

config interface 'loopback'
        option ifname 'lo'
        option proto 'static'
        option ipaddr '127.0.0.1'
        option netmask '255.0.0.0'

config interface 'lan'
        option ifname 'eth1'
        option proto 'static'
        option ipaddr '192.168.6.1'
        option netmask '255.255.255.0'

config interface 'wan0'
        option ifname 'wlan0'
        option proto 'dhcp'

config interface 'wan1'
        option ifname 'eth0'
        option proto 'dhcp'
    option ifname eth0
    option proto dhcp


Step 3:
/etc/config/dhcp

config dnsmasq
        option domainneeded '1'
        option boguspriv '1'
        option filterwin2k '0'
        option localise_queries '1'
        option rebind_protection '1'
        option rebind_localhost '1'
        option local '/lan/'
        option domain 'lan'
        option expandhosts '1'
        option nonegcache '0'
        option authoritative '1'
        option readethers '1'
        option leasefile '/tmp/dhcp.leases'
        option resolvfile '/tmp/resolv.conf.auto'

config dhcp 'lan'
        option interface 'lan'
        option start '100'
        option limit '150'
        option leasetime '12h'
        option dhcpv6 'server'
        option ra 'server'

config dhcp 'wan0'
        option interface 'wan0'
        option ignore '1'

config dhcp 'wan1'
        option interface 'wan1'
        option ignore '1'

config odhcpd 'odhcpd'
        option maindhcp '0'
        option leasefile '/tmp/hosts/odhcpd'
        option leasetrigger '/usr/sbin/odhcpd-update'

Step 4:
/etc/config/wireless

config wifi-device  radio0
        option type     mac80211
        option channel  8
        option hwmode   11g
        option path     'platform/ar933x_wmac'
        option htmode   HT40

config wifi-iface
        option device   radio0
        option network  lan
        option mode     ap
        option ssid     JoySince
        option encryption none

config wifi-iface
        option device 'radio0'
        option network 'wan0'
        option mode 'sta'
        option ssid 'wifi ssid name'
        option encryption 'psk2'
        option key 'wifi password'

Step 5:
/etc/init.d/network restart


ref:
https://my.oschina.net/lvsin/blog/392817     !!!!!!
https://my.oschina.net/lvsin/blog/384410
https://blog.csdn.net/gaopeiliang/article/details/40430915


Thursday, 2 August 2018

Tinkering OpenWRT (9) : Boot Loop? Don't Connect the Power Line!

I bought a core board of AR9331 running openWRT and trying to set it up. I simply used a cp2102 TTL to USB converter trying to serial monitoring it just like other CPUs: RX->TX, TX->RX, GND->GND and 3v3->3v3.

However, the problem I'm having is that it stuck in a boot loop forever. After I see the root@UserName:/# it would start from the top all over again and keeps looping.

I actually first had this experience with linkit smart 7688. I had to power it via the USB and only uses UART pins for serial communication. And I found the following in the openWRT document:

WARNING!: Some people reported they fried their router connecting the voltage pins spite it isn't neccesary. NEVER connect voltage pins when using USB adapters unless you know what are you doing. Unless you need to power the device, you don't have to connect the voltage pins. And you usually don't need to power it this way - use the router power supply.

OK so basically, an independent power line? Fine, I could provide 3v3 to the module with an Arduino. So I did the following connection:

AR9331       CP2102       Arduino
GND            GND            --
RX               TX               --
TX               RX               --
3V3              --                 3V3

Now I plugged in the CP2102 USB to my computer and open up the serial com and then I plugged in the Arduino cable to power it on. I got it stop looping once or twice. But when I come back a few days later it still loops.

So here is my working wiring:

AR9331       CP2102       Arduino
GND            --     works now            GND
RX               TX               --
TX               RX               --
3V3              --                 3V3

Basically, power the module from Arduino and only uses the TTL converter as UART.

I plugged in the TTL converter first and the Arduino cable. It almost like powering on an router after setting up the serial com. It does no loop anymore. I can start working.

It might still showing the following:

root@UserName:/# [ 4082.090000] wlan0: authenticate with ax:4y:zf:fd:12:
[ 4082.100000] wlan0: send auth to ax:4y:zf:fd:12:34 (try 1/3)
[ 4082.110000] wlan0: authenticated
[ 4082.120000] wlan0: associate with ax:4y:zf:fd:12:34 (try 1/3)
[ 4082.140000] wlan0: RX AssocResp from ax:4y:zf:fd:12:34 (capab=0x431 status=0 aid=5)
[ 4082.150000] wlan0: associated
[ 4086.150000] wlan0: disassociated from ax:4y:zf:fd:12:34 (Reason: 2)

It just means it tried to connect to the Router (Internet) but timed out. Press enter again it will come back to console.


ref:
https://wiki.openwrt.org/doc/hardware/port.serial.cables
https://openwrt.org/docs/techref/hardware/port.serial.cables
https://openwrt.org/docs/techref/hardware/port.serial

Monday, 23 July 2018

Tinkering OpenWRT (8) : Connect to WiFi

I just got my new Atheros core board and I'd like to set it up. The first thing of course is just to connect to the wifi and then I can install other things.

Step 1: go to vim /etc/config/wireless
config wifi-iface
        option device   radio0
        option network  lan
        option mode     ap
        option ssid     BorisWRT
        option encryption psk2+tkip+ccmp
        option key 888888

Step 2: Switch WiFi to BorisWRT

Step 3: Figure out the IP address
config interface 'lan'
        option ifname 'eth1'
        option force_link '1'
        option type 'bridge'
        option proto 'static'
        option ipaddr '192.168.1.251'
        option netmask '255.255.255.0'
        option ip6assign '60'

Step 4: go to the above LAN address
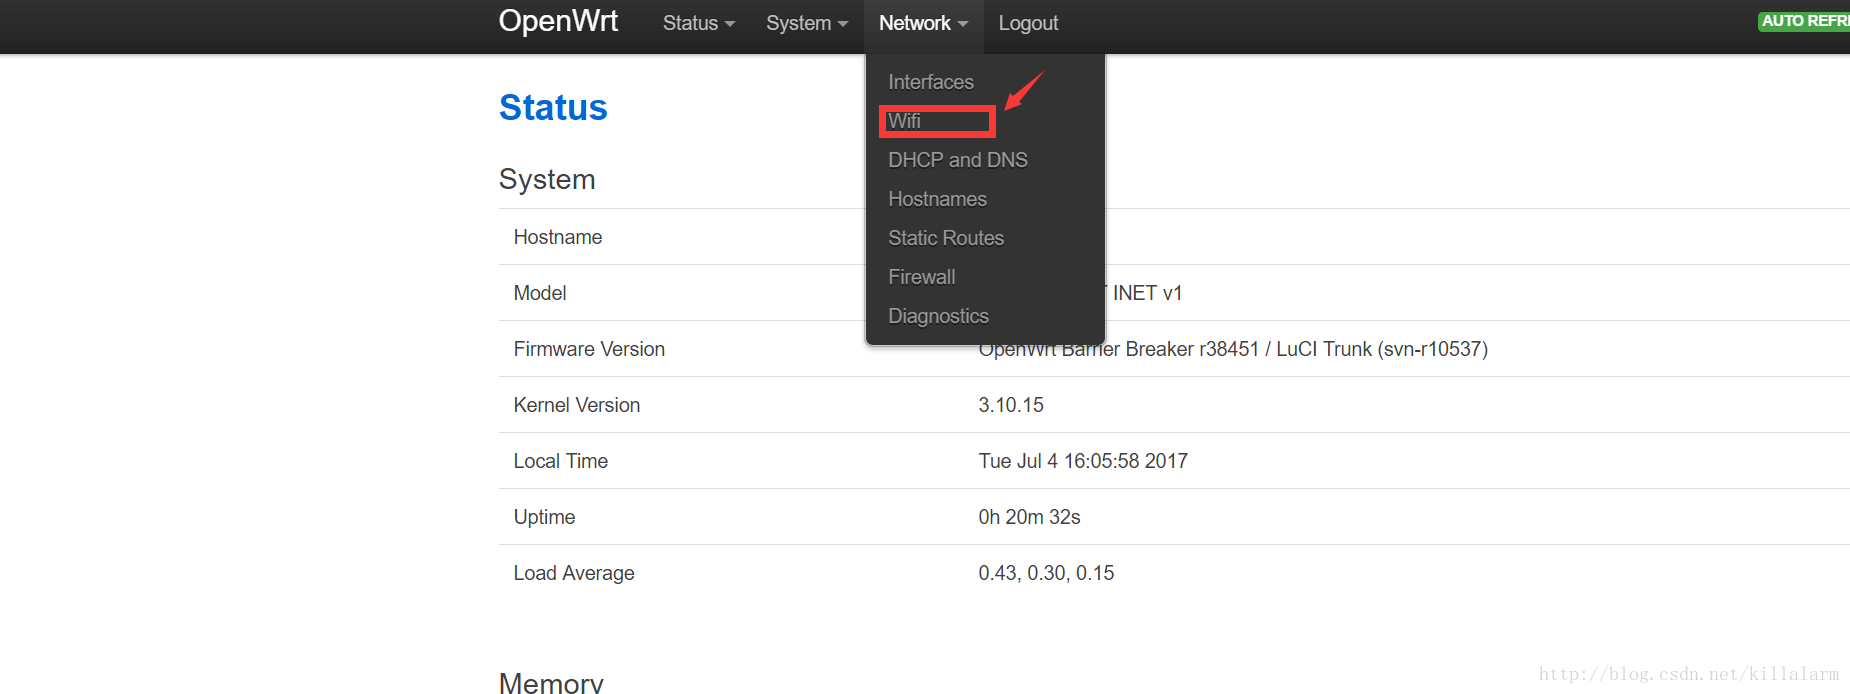
We can see the luci gui now.

Step 5: login luci to configure wifi


Step 6:


ref:
https://wiki.openwrt.org/zh-cn/doc/howto/firstlogin
https://blog.csdn.net/killalarm/article/details/74364685


Wednesday, 4 July 2018

Linux Kernel Module Helloworld Program


I was following the awesome tutorial The Linux Kernel Module Programming Guide until I compiled it and couldn't get it work. So I will just list the steps I did.

Step 1: coding

/*  
 *  hello-1.c - The simplest kernel module.
 */
#include <linux/module.h> /* Needed by all modules */
#include <linux/kernel.h> /* Needed for KERN_INFO */

int init_module(void)
{
 printk(KERN_INFO "Hello world 1.\n");

 /* 
  * A non 0 return means init_module failed; module can't be loaded. 
  */
 return 0;
}

void cleanup_module(void)
{
 printk(KERN_INFO "Goodbye world 1.\n");
}

Step 2: Makefile

obj-m += hello-1.o

all:
 make -C /lib/modules/$(shell uname -r)/build M=$(PWD) modules

clean:
 make -C /lib/modules/$(shell uname -r)/build M=$(PWD) clean


Step 3: compile
$ make
make -C /lib/modules/3.19.0-25-generic/build M=/home/boris/workspace/TheLinuxKernelModuleProgrammingGuide/hello-1 modules
make[1]: Entering directory `/usr/src/linux-headers-3.19.0-25-generic'
  Building modules, stage 2.
  MODPOST 1 modules
make[1]: Leaving directory `/usr/src/linux-headers-3.19.0-25-generic'

Step 4: Insert the module
sudo insmod ./hello-1.ko

Step 5: 
$ cat /proc/modules
hello_1 16384 0 - Live 0x00000000 (POE)    <====== here it is!
cp210x 24576 0 - Live 0x00000000
usbserial 40960 1 cp210x, Live 0x00000000
ctr 16384 1 - Live 0x00000000
ccm 20480 1 - Live 0x00000000
rfcomm 61440 0 - Live 0x00000000
...
...


Step 6: 
$ dmesg
...
...
[ 8741.483837] hello_1: module license 'unspecified' taints kernel.
[ 8741.483841] Disabling lock debugging due to kernel taint
[ 8741.483881] hello_1: module verification failed: signature and/or  required key missing - tainting kernel
[ 8741.484112] Hello world 1.


Step 7:
$ cat /var/log/syslog | grep hello
Jul  4 21:07:34 boris-XYZ kernel: [ 8741.483837] hello_1: module license 'unspecified' taints kernel.
Jul  4 21:07:34 boris-XYZ kernel: [ 8741.483881] hello_1: module verification failed: signature and/or  required key missing - tainting kernel

Step 8:
$ sudo rmmod hello-1
$ dmesg
...
...
[ 8741.483837] hello_1: module license 'unspecified' taints kernel.
[ 8741.483841] Disabling lock debugging due to kernel taint
[ 8741.483881] hello_1: module verification failed: signature and/or  required key missing - tainting kernel
[ 8741.484112] Hello world 1.
[ 9291.123571] Goodbye world 1.


ref:
https://www.tldp.org/LDP/lkmpg/2.6/html/x121.html
https://blog.csdn.net/fantasy_wxe/article/details/12379647
https://blog.csdn.net/zhangyifei216/article/details/49703435

Sunday, 17 June 2018

Linkit Getting Started


Step 1: Wiring
I am using a cp2102 ttl to usb converter. And this is the connection from the official website.


Very interestingly, there is no power line listed. So I tried connecting 3.3V from the cp2102 to the 3.3V on Linkit. But the system just keeps booting again and again for some reason.

This is what I did:
    -  keep the above three connections but no power;
    -  use a usb cable to supply power. Connect it to "pwr" port (not "host").

Step 2:
screen /dev/ttyUSB0 57600

Step 3: Blink
python /IoT/examples/blink-gpio44.py

ref:
http://wiki.seeedstudio.com/LinkIt_Smart_7688/

Thursday, 14 June 2018

Nutstore problem: SSL failed to connect

备份并移除老的cacerts
sudo mv /etc/ssl/certs/java/cacerts{,.backup}


生成新的cacerts
sudo keytool -importkeystore -destkeystore /etc/ssl/certs/java/cacerts -deststoretype jks -deststorepass changeit -srckeystore /etc/ssl/certs/java/cacerts.backup -srcstoretype pkcs12 -srcstorepass changeit


询问官方后官方提供的临时解决方案

ref:
http://tieba.baidu.com/p/5680448441
I got the following error when installing matplotlib:

sudo python -mpip install -U matplotlib

Command "/usr/bin/python -u -c "import setuptools, tokenize;__file__='/tmp/pip-install-t_g0M1/subprocess32/setup.py';f=getattr(tokenize, 'open', open)(__file__);code=f.read().replace('\r\n', '\n');f.close();exec(compile(code, __file__, 'exec'))" install --record /tmp/pip-record-YcuLqR/install-record.txt --single-version-externally-managed --compile" failed with error code 1 in /tmp/pip-install-t_g0M1/subprocess32/

I fixed it by installing python-dev:
sudo apt-get install python-dev

ref:
https://github.com/google/python-subprocess32/issues/38

Wednesday, 23 May 2018

Android Studio: /dev/kvm device permission denied

I installed my Android Studio in my Home directory rather than /. So at first I thought I need to somehow do sudo. Then I tried sudo ./studio.sh but it ask me to install the AS again.

This worked for me:

To check the ownership of /dev/kvm use
ls -al /dev/kvm
The user was root, the group kvm. To check which users are in the kvm group, use
grep kvm /etc/group
This returned
kvm:x:some_number:
on my system: as there is nothing left to the final :, there are no users in the kvm group.
To add the user username to the kvm group, you could use
sudo adduser username kvm
which adds the user to the group, and check once again with grep kvm /etc/group.
Log out and back in (or restart), for the permissions to take effect. If you get the message
adduser: The group kvm does not exist.
On Ubuntu 18.04 you need to additionally sudo apt install qemu-kvm.


ref:
https://stackoverflow.com/questions/37300811/android-studio-dev-kvm-device-permission-denied

Thursday, 10 May 2018

Set a PIN to OPEN DRAIN


digitalWriteOpenDrain(byte pin, bool state)
{
    if (state==LOW)
    {
        pinMode(pin, OUTPUT);
        digitalWrite(pin, LOW);
    }
    else //state==HIGH
    {
        pinMode(pin, INPUT); // Getting HiZ output from this pin
        digitalWrite(pin, LOW);
    }
}


ref:
https://electronics.stackexchange.com/questions/28091/push-pull-open-drain-pull-up-pull-down
https://blog.csdn.net/fengyu09/article/details/50317423
http://www.st.com/content/ccc/resource/technical/document/reference_manual/51/f7/f3/06/cd/b6/46/ec/CD00225773.pdf/files/CD00225773.pdf/jcr:content/translations/en.CD00225773.pdf
http://www.st.com/content/ccc/resource/technical/document/datasheet/bc/21/42/43/b0/f3/4d/d3/CD00237391.pdf/files/CD00237391.pdf/jcr:content/translations/en.CD00237391.pdf
https://github.com/particle-iot/firmware/blob/1a0c5a2c204b312ae8c0435728999d6e3f296ead/hal/src/stm32f2xx/gpio_hal.c#L78
https://community.particle.io/t/electron-open-drain-output-gpio/20196/3
https://electronics.stackexchange.com/questions/156930/stm32-understanding-gpio-settings
https://github.com/DFRobot/STM32/blob/master/cores/blunoM3/wiring_digital.c
https://sites.google.com/site/learningeclipsearm/5-using-stm32-std-lib/b-digital-io-pins
http://m.www.cnblogs.com/luckyalan/p/5154829.html


Tuesday, 8 May 2018

PlatformIO Daily Use Practice


(1) Start a new project
             $ platformio init --board uno --board nanoatmega328

If you need to add new board to the existing project please use platformio init again with all boards included.

(2) compile
Just compile:
             $platformio run
or
             $platformio run -e nanoatmega328

(3) flash/upload
             $platformio run -e nanoatmega328 -t upload
The awesome thing about this is that, even if using a CP2102 TTL to USB, it works perfectly.

(4) more...


ref:
http://docs.platformio.org/en/latest/quickstart.html

Thursday, 26 April 2018

Move a tag on a git Branch to a Different Commit

You might forget to do something before you tag a commit. Then you realize OMG I gotta make that small change or delete something etc. You would have a new commit after the tag you've just made so you want to move the tag to this new commit. Here is how.

  1. Delete the tag on any remote before you push
    git push origin :refs/tags/<tagname>
    
  2. Replace the tag to reference the most recent commit
    git tag -fa <tagname>
    
  3. Push the tag to the remote origin
    git push --tags

ref:
https://stackoverflow.com/questions/8044583/how-can-i-move-a-tag-on-a-git-branch-to-a-different-commit

Sunday, 8 April 2018


Some dependencies to install:

sudo apt-get install gperf
sudo apt-get install bison
sudo apt-get install texinfo
sudo apt-get install flex
sudo apt-get install help2man


Then follow the github steps:
https://github.com/pfalcon/esp-open-sdk

ref:
https://github.com/pfalcon/esp-open-sdk

Thursday, 5 April 2018

Using USBTinyISP

Try to just use avrdude so that things can be automated with Python scripts.

- Flash Bootloader

  1. Put a fresh AVR chip (such as an Atmega328) into the Arduino in the correct orientation
  2. Remove the jumper from the USBtinyISP
  3. Plug in the USBtiny to USB
  4. Plug the Arduino into DC or USB so it is powered
  5. Plug the 6 pin cable from the USBtinyISP into the Arduino so that pin 1 mark is lined up with the red wire on the cable
  6. Start up Arduino IDE
  7. Select the chip/Arduino you are using in the Tools->Board menu
  8. Do not select a COM/Serial port
  9. Select Tools->Burn Bootloader->w/USBtinyISP
  10. The USBtinyISP red LED should light up. It will take a minute or two to program the chip
  11. When it is done, the IDE will tell you it has completed and the red LED will be off.

########################

The above method needs to be updated with pure avrdude so the process could be automated. Or, maybe no bootloader is needed if we are using USBTinyISP.

More tests coming...


- Flash arduino sketch

(1) Put the jumper back on the USBTinyISP, unplug power supply (USB cable) connected to Arduino.

(2) Plug the 6 pin cable from the USBtinyISP into the Arduino so that pin 1 mark is lined up with the red wire on the cable


Arduino should now be powered from USBTinyISP.

(3) avrdude -c usbtiny -p atmega328p -U flash:w:blink.hex

Probably need sudo
OR, install the udev rule. Check:
https://learn.adafruit.com/usbtinyisp/avrdude


###################################################################

ref:
https://learn.sparkfun.com/tutorials/pocket-avr-programmer-hookup-guide/using-avrdude
https://learn.adafruit.com/usbtinyisp/user-manual
https://learn.adafruit.com/usbtinyisp/avrdude
https://www.arduino.cc/en/Hacking/Programmer

Friday, 23 March 2018

OpenCV Helloworld Trouble


Just want to quickly do an openCV helloworld:

#include <iostream>
#include <opencv2/opencv.hpp>

using namespace std;
using namespace cv;

int main()
{
Mat srcImage = imread("lena.jpg");
imshow("image",srcImage);

waitKey(0);

return 0;
}

Compile:
g++ `pkg-config opencv --cflags` opencv.cpp -o opencv `pkg-config opencv --libs` 

but I got this error:
OpenCV Error: Unspecified error (The function is not implemented. Rebuild the library with Windows, GTK+ 2.x or Carbon support. If you are on Ubuntu or Debian, install libgtk2.0-dev and pkg-config, then re-run cmake or configure script) in cvShowImage, file /home/boris/Softwares/openCV/opencv/modules/highgui/src/window.cpp, line 611 terminate called after throwing an instance of 'cv::Exception' what(): /home/boris/Softwares/openCV/opencv/modules/highgui/src/window.cpp:611: error: (-2) The function is not implemented. Rebuild the library with Windows, GTK+ 2.x or Carbon support. If you are on Ubuntu or Debian, install libgtk2.0-dev and pkg-config, then re-run cmake or configure script in function cvShowImage

Something is wrong with QT?

sudo apt-get install libqt4-dev
cmake -D WITH_QT=ON ..
make
sudo make install

ref:
https://stackoverflow.com/questions/14655969/opencv-error-the-function-is-not-implemented
https://blog.csdn.net/keith_bb/article/details/52864851


Thursday, 22 March 2018

Just Installed openCV


Error:
./opencv: error while loading shared libraries: libopencv_highgui.so.3.3: cannot open shared object file: No such file or directory

$ sudo ldconfig


ref:
https://github.com/pjreddie/darknet/issues/382

Install openCV on Ubuntu 16.04

I was installing openCV following the instruction from the first google search:
          https://www.learnopencv.com/install-opencv3-on-ubuntu/

But I met the following problems so far.

sudo apt-get install git gfortran

error:
The following packages have unmet dependencies:
 gfortran : Depends: gfortran-5 (>= 5.3.1-3~) but it is not going to be installed
E: Unable to correct problems, you have held broken packages.

solution:
sudo add-apt-repository ppa:ubuntu-toolchain-r/test
sudo apt-get update
sudo apt-get install gfortran-5
Now do it again and it works.

/////////////////////////////////////////////////////////////////////////////////////////////////////////////

sudo apt-get install libjpeg8-dev libjasper-dev libpng12-dev

error:
The following packages have unmet dependencies:
 libjasper-dev : Depends: libjasper1 (= 1.900.1-debian1-2.4ubuntu1) but 1.900.1-debian1-2.4ubuntu1.1 is to be installed
E: Unable to correct problems, you have held broken packages.

solution:
sudo add-apt-repository "deb http://security.ubuntu.com/ubuntu xenial-security main"
sudo apt update
sudo apt install libjasper1 libjasper-dev

Now do it again and it works.

/////////////////////////////////////////////////////////////////////////////////////////////////////////////

~$ sudo apt-get install libavcodec-dev libavformat-dev libswscale-dev libdc1394-22-dev
E: Could not get lock /var/lib/dpkg/lock - open (11: Resource temporarily unavailable) 
E: Unable to lock the administration directory (/var/lib/dpkg/), is another process using it?

Solution:
sudo rm /var/lib/apt/lists/lock
sudo rm /var/cache/apt/archives/lock
sudo rm /var/lib/dpkg/lock
~$ sudo apt-get install libavcodec-dev libavformat-dev libswscale-dev libdc1394-22-dev
E: dpkg was interrupted, you must manually run 'sudo dpkg --configure -a' to correct the problem.

~$ sudo dpkg --configure -a

Do it again and worked:
~$ sudo apt-get install libavcodec-dev libavformat-dev libswscale-dev libdc1394-22-dev

////////////////////////////////////////////////////////////////////////////////////////////////////////////////

~$ sudo apt-get install libgstreamer0.10-dev libgstreamer-plugins-base0.10-dev

error:
The following packages have unmet dependencies:
 libgstreamer-plugins-base0.10-dev : Depends: libglib2.0-dev but it is not going to be installed
 libgstreamer0.10-dev : Depends: libglib2.0-dev but it is not going to be installed
E: Unable to correct problems, you have held broken packages.

Solution:
Install the dependency libglib2.0-dev:
sudo apt-get install libglib2.0-dev libglib2.0-0=2.48.0-1ubuntu4

Do it again and worked:
~$ sudo apt-get install libgstreamer0.10-dev libgstreamer-plugins-base0.10-dev

////////////////////////////////////////////////////////////////////////////////////////////////////////////////

sudo apt-get install qt5-default libgtk2.0-dev libtbb-dev
I jumped over qt5-default, too many dependencies...so just:
~$ sudo apt-get install libgtk2.0-dev libtbb-dev

////////////////////////////////////////////////////////////////////////////////////////////////////////////////

sudo apt-get install python-dev python-pip python3-dev python3-pip

errors:
The following packages have unmet dependencies:
 python3-pip : Depends: python-pip-whl (= 8.1.1-2) but 8.1.1-2ubuntu0.4 is to be installed
               Recommends: python3-setuptools but it is not going to be installed
               Recommends: python3-wheel but it is not going to be installed
E: Unable to correct problems, you have held broken packages.

solution:
Don't know yet...I jumped over python3-pip for now.

/////////////////////////////////////////////////////////////////////////////////////////////////////

OK finally cmake...but I got errors. After trying a lot to install some dependencies like qt5, I still couldn't get rid of the errors. I found the official website has a tutorial about installation:
            
                https://docs.opencv.org/trunk/d2/de6/tutorial_py_setup_in_ubuntu.html

Note that you have to delete ./build directory and create a new folder and do:
$ cmake ../

...and it worked!
..............
-- -----------------------------------------------------------------
-- 
-- Configuring done
-- Generating done
 ...................


ref:
https://www.learnopencv.com/install-opencv3-on-ubuntu/
https://askubuntu.com/questions/720948/problems-installing-gfortran
https://github.com/opencv/opencv/issues/8622
https://askubuntu.com/questions/15433/unable-to-lock-the-administration-directory-var-lib-dpkg-is-another-process
https://askubuntu.com/questions/884413/unable-to-install-libgtk2-0-dev-on-ubuntu-16-04/886022

https://docs.opencv.org/trunk/d2/de6/tutorial_py_setup_in_ubuntu.html
https://docs.opencv.org/trunk/d7/d9f/tutorial_linux_install.html

Tuesday, 20 March 2018

Problem with Spotify Keys


Problem:

W: An error occurred during the signature verification. The repository is not updated and the previous index files will be used. GPG error: http://repository.spotify.com stable InRelease: The following signatures couldn't be verified because the public key is not available: NO_PUBKEY EFDC8610341D9410
W: Failed to fetch http://repository.spotify.com/dists/stable/InRelease  The following signatures couldn't be verified because the public key is not available: NO_PUBKEY EFDC8610341D9410
W: Some index files failed to download. They have been ignored, or old ones used instead.

####################################################################3


This happen when somehow we'd lost the keys.
To solve i have executed the first step listed here https://www.spotify.com/de/download/linux/

sudo apt-key adv --keyserver hkp://keyserver.ubuntu.com:80 --recv-keys 0DF731E45CE24F27EEEB1450EFDC8610341D9410


ref:
https://superuser.com/questions/932781/failed-to-fetch-spotify-repository-while-updating-ubuntu