Thursday, 28 December 2017

Print a Range of a char Array without a for Loop

Code:
#include <stdio.h> 
 int main() 
   char a[1024] = "abcdefghijklmnopqrstuvwxyz";  
   printf("Characters 0 through 2 of a[]: %.3s\n", a); 
   printf("Characters 10 through 15 of a[]: %.6s\n", &a[10]); return 0; 
}

Prints this:
Characters 0 through 2 of a[]: abc 
Characters 10 through 15 of a[]: klmnop

The "%.Ns" notation in the printf string is "%s" with a precision specifier. It's buried in the geek-speak in the printf(3) man page


ref:
https://www.linuxquestions.org/questions/programming-9/is-there-a-way-to-print-a-range-of-a-char-array-without-a-for-loop-842798/

Tuesday, 26 December 2017

Arduino Command Line Usage


arduino is simply a program from your installation directory. Without any parameters, it would just start the Arduino IDE.

open ~/.bashrc and add the following line at the bottom:
              PATH=$PATH:/home/aaa/xxx/yyy/arduinoIDE/arduino-1.8.2
Now we can use cmd "arduino" everywhere.

Use cases:
For arduino nano:
arduino --board arduino:avr:nano:cpu=atmega328 --port /dev/ttyUSB0 --upload beep.ino

Serial Monitor:
picocom /dev/ttyUSB0 -b 9600

ref:
https://unix.stackexchange.com/questions/26047/how-to-correctly-add-a-path-to-path
https://github.com/arduino/Arduino/blob/master/build/shared/manpage.adoc

Tuesday, 19 December 2017

I think the following problems are the same:

Problem 1:
E: Could not get lock /var/lib/dpkg/lock - open (11: Resource temporarily unavailable)
E: Unable to lock the administration directory (/var/lib/dpkg/), is another process using it?


Problem  2:
sudo apt-get -f install
Reading package lists... Done
Building dependency tree       
Reading state information... Done
0 upgraded, 0 newly installed, 0 to remove and 39 not upgraded.
5 not fully installed or removed.
After this operation, 0 B of additional disk space will be used.
Setting up linux-image-extra-4.4.0-104-generic (4.4.0-104.127) ...
run-parts: executing /etc/kernel/postinst.d/apt-auto-removal 4.4.0-104-generic /boot/vmlinuz-4.4.0-104-generic
run-parts: executing /etc/kernel/postinst.d/initramfs-tools 4.4.0-104-generic /boot/vmlinuz-4.4.0-104-generic
update-initramfs: Generating /boot/initrd.img-4.4.0-104-generic

gzip: stdout: No space left on device
E: mkinitramfs failure cpio 141 gzip 1
update-initramfs: failed for /boot/initrd.img-4.4.0-104-generic with 1.
run-parts: /etc/kernel/postinst.d/initramfs-tools exited with return code 1
dpkg: error processing package linux-image-extra-4.4.0-104-generic (--configure):
 subprocess installed post-installation script returned error exit status 1
dpkg: dependency problems prevent configuration of linux-image-generic:
 linux-image-generic depends on linux-image-extra-4.4.0-104-generic; however:
  Package linux-image-extra-4.4.0-104-generic is not configured yet.

dpkg: error processing package linux-image-generic (--configure):
 dependency problems - leaving unconfigured
dpkg: dependency problems prevent configuration of linux-generic:
 linux-generic depends on linux-image-generic (= 4.4.0.104.109); however:
  Package linux-image-generic is not configured yet.

dpkg: error processing package linux-generic (--configure):
 dependency problems - leaving unconfigured
Setting up linux-image-4.4.0-98-generic (4.4.0-98.121) ...
No apport report written because the error message indicates its a followup error from a previous failure.
                                                                                                          No apport report written because the error message indicates its a followup error from a previous failure.
                                                                             Running depmod.
update-initramfs: deferring update (hook will be called later)
The link /initrd.img is a dangling linkto /boot/initrd.img-4.4.0-98-generic
vmlinuz(/boot/vmlinuz-4.4.0-98-generic
) points to /boot/vmlinuz-4.4.0-98-generic
 (/boot/vmlinuz-4.4.0-98-generic) -- doing nothing at /var/lib/dpkg/info/linux-image-4.4.0-98-generic.postinst line 491.
Examining /etc/kernel/postinst.d.
run-parts: executing /etc/kernel/postinst.d/apt-auto-removal 4.4.0-98-generic /boot/vmlinuz-4.4.0-98-generic
run-parts: executing /etc/kernel/postinst.d/initramfs-tools 4.4.0-98-generic /boot/vmlinuz-4.4.0-98-generic
update-initramfs: Generating /boot/initrd.img-4.4.0-98-generic

gzip: stdout: No space left on device
E: mkinitramfs failure cpio 141 gzip 1
update-initramfs: failed for /boot/initrd.img-4.4.0-98-generic with 1.
run-parts: /etc/kernel/postinst.d/initramfs-tools exited with return code 1
Failed to process /etc/kernel/postinst.d at /var/lib/dpkg/info/linux-image-4.4.0-98-generic.postinst line 1052.
dpkg: error processing package linux-image-4.4.0-98-generic (--configure):
 subprocess installed post-installation script returned error exit status 2
No apport report written because MaxReports is reached already
                                                              dpkg: dependency problems prevent configuration of linux-image-extra-4.4.0-98-generic:
 linux-image-extra-4.4.0-98-generic depends on linux-image-4.4.0-98-generic; however:
  Package linux-image-4.4.0-98-generic is not configured yet.

dpkg: error processing package linux-image-extra-4.4.0-98-generic (--configure):
 dependency problems - leaving unconfigured
No apport report written because MaxReports is reached already
                                                              Errors were encountered while processing:
 linux-image-extra-4.4.0-104-generic
 linux-image-generic
 linux-generic
 linux-image-4.4.0-98-generic
 linux-image-extra-4.4.0-98-generic
E: Sub-process /usr/bin/dpkg returned an error code (1)

Problem  3:
The volume "boot" has only  bytes disk space remaining

//////////////////////////////////////////////////////////////////////////////////////////////////////////////////
Solution:

Step 1:
List all the current existing kernels.

ls /boot/ | grep vmlinuz
vmlinuz-4.4.0-104-generic
vmlinuz-4.4.0-97-generic
vmlinuz-4.4.0-98-generic

Step 2:
Find the current kernel in use.

uname -r
4.4.0-97-generic

Step 3:
Remove one of them not in use:

sudo apt-get purge linux-image-4.4.0-104-generic
Reading package lists... Done
Building dependency tree       
Reading state information... Done
The following packages were automatically installed and are no longer required:
  linux-headers-4.4.0-104 linux-headers-4.4.0-104-generic linux-headers-generic thermald
Use 'sudo apt autoremove' to remove them.
0 upgraded, 0 newly installed, 0 to remove and 39 not upgraded.


ref:
https://askubuntu.com/questions/218783/the-volume-boot-has-only-0-bytes-disk-space-remaining


Thursday, 7 December 2017

Toubleshooting: ampy "could not enter raw repl" error


When using ampy tool, nothing works!

ampy --port /dev/ttyUSB0 get boot.py

>>> 
Traceback (most recent call last):
  File "/usr/local/bin/ampy", line 11, in <module>
    sys.exit(cli())
  File "/usr/local/lib/python2.7/dist-packages/click/core.py", line 722, in __call__
    return self.main(*args, **kwargs)
  File "/usr/local/lib/python2.7/dist-packages/click/core.py", line 697, in main
    rv = self.invoke(ctx)
  File "/usr/local/lib/python2.7/dist-packages/click/core.py", line 1066, in invoke
    return _process_result(sub_ctx.command.invoke(sub_ctx))
  File "/usr/local/lib/python2.7/dist-packages/click/core.py", line 895, in invoke
    return ctx.invoke(self.callback, **ctx.params)
  File "/usr/local/lib/python2.7/dist-packages/click/core.py", line 535, in invoke
    return callback(*args, **kwargs)
  File "/usr/local/lib/python2.7/dist-packages/ampy/cli.py", line 96, in get
    contents = board_files.get(remote_file)
  File "/usr/local/lib/python2.7/dist-packages/ampy/files.py", line 68, in get
    self._pyboard.enter_raw_repl()
  File "/usr/local/lib/python2.7/dist-packages/ampy/pyboard.py", line 184, in enter_raw_repl
    raise PyboardError('could not enter raw repl')
ampy.pyboard.PyboardError: could not enter raw repl

On the NodeMCU side it prints:
...
>>>
>raw REPL; CTRL-B to exit >

The reason is because the serial port is busy. So after I closed the REPL python terminal and called ampy again, every thing works perfectly. 


ref:
http://forums.openmv.io/viewtopic.php?t=298

Casting Bitwise struct to Integer

I have bitwise structure with a bunch of flags.

struct {
  uint8_t a: 4; 
  uint8_t b: 4; 
} _tVarA

_tVarA Var_A = {0,0};

But when I want to view them as a whole integer, I need to cast it like this:
                               *(uint8_t*)&Var_A

ref:
http://www.avrfreaks.net/forum/casting-bitfield-struct-integer
https://stackoverflow.com/questions/11903820/casting-struct-into-int

Tuesday, 5 December 2017

Programming ESP8266 (01) using FTDI and Arduino IDE

ESP8266 is essentially a microcontroller. We can do development to it from the Arduino IDE.

Step 1: Install the ESP8266 board in Arduino IDE

According to the first method from https://github.com/esp8266/Arduino

(1) Start Arduino and open Preferences window.
(2) Enter http://arduino.esp8266.com/stable/package_esp8266com_index.json into Additional Board Manager URLsfield. You can add multiple URLs, separating them with commas.
(3) Open Boards Manager from Tools > Board menu and install esp8266 platform (and don't forget to select your ESP8266 board from Tools > Board menu after installation).


Step 2: Wiring
The Wiring is 90% the same from my last post: Getting Started with esp8266-01 as shown below:


The only thing different is that we must connect GND from FTDI to GPIO0 on ESP8266. This is to set the ESP8266 into "bootloading" mode. RST and GPIO2 pins can be left floating.


Step 3: Coding
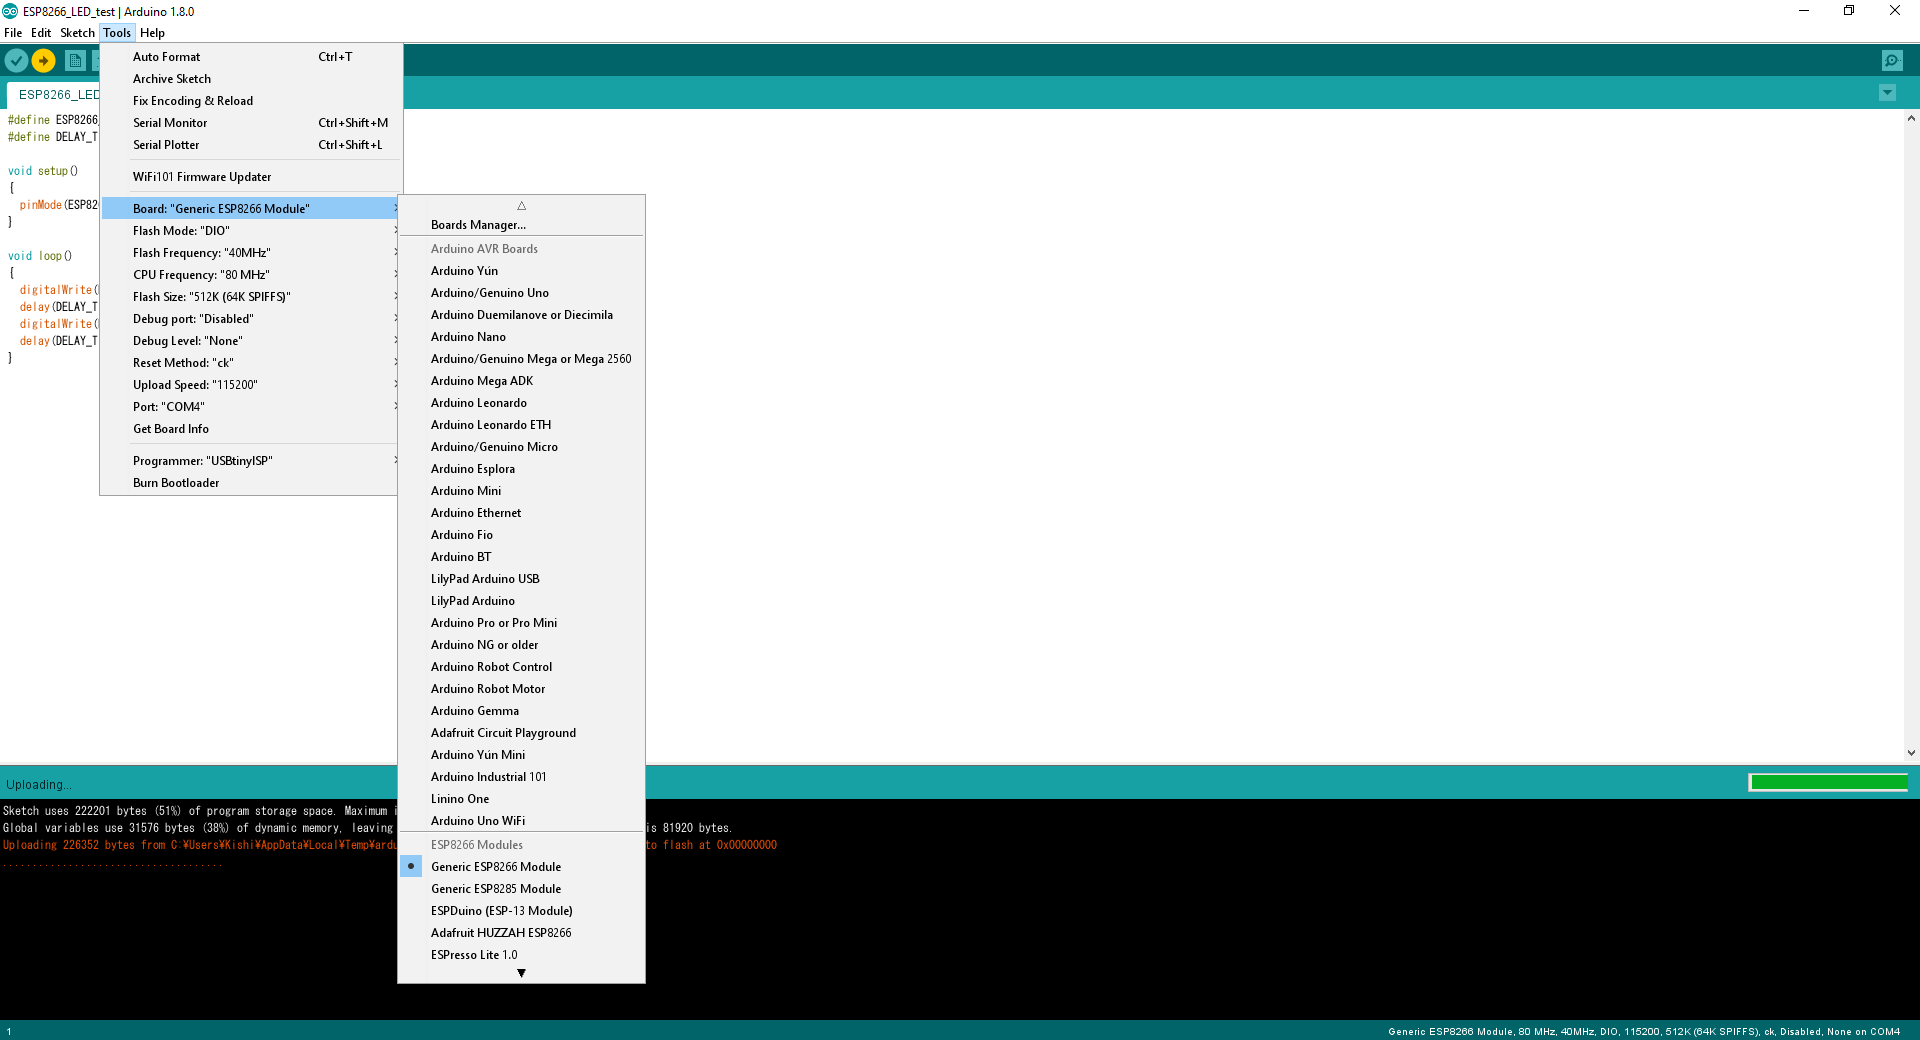
If the board is chosen from Tool > Board as General ESP8266, we can just pull the blinky example from File > examples.


Step 4: Flash the Module

Flash the board using the following parameters.
/////////////////////////////////////////////////////////////////////////////////////////////

Troubleshooting:
(1)
At first I got the following error message:

warning: espcomm_sync failed
error: espcomm_open failed
error: espcomm_upload_mem failed


Checked online and find some hints. The cause can be one of two things:

(1) Insufficient power. Try to power the ESP8266 from an external 3.3V power supply such as a lab supply. Two fully charged AA batteries should do the trick too. Make sure your serial adapter's GND pin is also connected to the ESP's GND pin in order to provide a common ground.

(2) ESP8266 is not in programming mode. Make sure GPIO0 is attached to GND and turn the ESP off and on again. It will then boot into programming mode. Once programmed, you can take it off GND.
So here is what I did:

> unplug the GND <=> GPIO0
basically go back the the getting start with ESP8266 post and do "AT" command and got "OK".

> plug the GND <=> GPIO0 back again
Flash and it worked!! You can see the blue led blinking.


(2)
Next day, I plug in the ftdi and the blue is NOT blinking any more. We must put it back to normal mode by unplug the GPIO0 from GND.


ref:
https://www.monocilindro.com/2017/02/25/flashing-esp8266-using-ftdi-and-arduino-ide/
https://github.com/esp8266/Arduino
https://stackoverflow.com/questions/31371969/cannot-program-esp8266

Monday, 4 December 2017

Getting Started with the ESP8266 (01)

Step 1: Wiring

I got a ESP-01 version of this module, which has 8 pins: VCC, GND, CH_PD, TX, RX, RST, GPIO0, and GPIO1. Wiring the module is not complicated and should be the same for all versions of this module:

  • VCC needs 3.3V
  • CH_PD has to be pulled-up (meaning it has to be connected to 3.3V as well)
  • GND is connected to FTDI’s GND pin
  • RX is connected to FTDI’s TX pin, because you want to create a loop: RX-> TX => RX -> TX
  • TX is connected to FTDI’s RX pin
  • other pins are left floating

VERY VERY IMPORTANTLY, this module needs 3.3V, not 5V which is what most FTDIs supply. Even if your FTDI module has an 3.3V output or a switch to change the voltage, please measure it with a multimeter to make sure it is outputing 3.3V exactly. I wasted more than one hour just because I trusted the piece of garbage!!!!

Step 2: Communication


Open the serial monitor from Arduino IDE, change the two settings at the right bottom corner according to the above picture. As you can see, my first 3 AT command didn't go through because of the carriage return is not there.


ref:
http://williamdurand.fr/2015/03/17/playing-with-a-esp8266-wifi-module/
http://rancidbacon.com/files/kiwicon8/ESP8266_WiFi_Module_Quick_Start_Guide_v_1.0.4.pdf
http://www.instructables.com/id/Getting-Started-With-the-ESP8266-ESP-01/

STATIC Variables and Functions in C


ref:
http://www.jianshu.com/p/f413ba3b2728
http://www.cnblogs.com/wly603/archive/2012/04/11/2442065.html
http://bbs.csdn.net/topics/350238100
http://www.cppblog.com/dbkong/archive/2006/12/09/16169.html

Build MicroPython Firmware for ESP8266


ref:
https://learn.adafruit.com/building-and-running-micropython-on-the-esp8266/build-firmware
https://github.com/micropython/micropython/wiki/Getting-Started

Friday, 24 November 2017

Create your Own I2C module

If you have a daughter system, for example sensor(s), and you need to talk to it from the master MCU, you can of course use CAN bus. But you can also turn it into an I2C module.

ref:
http://www.instructables.com/id/I2C-between-Arduinos/
http://dsscircuits.com/articles/arduino-i2c-slave-guide

Create a New Branch from a History Commit

When we want to checkout a new branch we do:

git checkout -b name-of-new-branch 

This is actually shorten for:

git checkout -b name-of-new-branch current-branch 

That is to say, if we don't specify the starting point of this new branch, it starts by default from the current active branch. Since every commit has an SHA1 (Hash value) as its ID, we can use these IDs as the start pointer when we are using checkout command. For example:

git checkout -b name-of-new-branch 169d2dc 

In this way, the active branch is now switched to this new branch and things are the same with branch 169d2dc.

Note that we might need to use the long full SHA1 ID in case the short one conflicts with others.


ref:
https://liam0205.me/2015/04/29/git-checkout-history-version/

Git Workflow for Embedded Systems

The special thing about embedded system is that it sits in between software and hardware. Therefore, you might hit walls if adopting the traditional git workflow. The following blog specified the obstacles really well:

https://medium.com/jumperiot/how-to-use-git-flow-in-embedded-software-development-dbb2a78da413

I met the problem of different hardware configurations and I have to go back to history versions to branch out and do some redundant work. But most importantly, keep the following three things in mind:

(1) Split the code base into unrelated libraries/modules that support different configurations, manage them separately and then do a configuration management. Note that you’ll need to invest in proper software architecture and abstraction layers.
(2) Control different configuration with features flags on the same branches.
(3) Create isolated and long lived branches for each version/hardware configuration.

ref:
https://medium.com/jumperiot/how-to-use-git-flow-in-embedded-software-development-dbb2a78da413
https://liam0205.me/2015/04/29/git-checkout-history-version/

Thursday, 23 November 2017

Producer Consumer Model in Python

All credits go to Akshar Raaj

Note that if Queue is used, queue itself is threading safe to use because Queue encapsulates the behaviour of Condition, wait(), notify(), acquire() etc.

ref:
http://agiliq.com/blog/2013/10/producer-consumer-problem-in-python/

Wednesday, 22 November 2017

Install Python 3 Packets

By default if you install something by
      pip install some_packet
I got the packet in Python 2.7 installed.

But if a packet, say pyusb, is a dependent to another packet that has be on Python 3, say pystlink, I will get:

Traceback (most recent call last):
  File "pystlink.py", line 4, in <module>
    import lib.stlinkusb
  File "/home/boris/Softwares/EmbeddedSystem/pystlink/pystlink-master/lib/stlinkusb.py", line 1, in <module>
    import usb.core
ImportError: No module named 'usb'

If I try to go to Python 3 and import usb, I would get the same output. Therefore, I need to install pyusb in Python 3 and here is how.

sudo apt-get install python3-pip
sudo pip3 install MODULE_NAME

ref:
https://stackoverflow.com/questions/10763440/how-to-install-python3-version-of-package-via-pip-on-ubuntu

Monday, 20 November 2017

UART Communication Between NodeMCU and Arduino

First, I'm using MicroPython on the NodeMCU side.

Test 1:
Connections:
VIN     -    VIN
GND   -    GND
3          -    D3
2          -    D2

Arduino side code:
#include <SoftwareSerial.h>
SoftwareSerial ArduinoSerial(3, 2); // RX, TX
void setup() 
{
  Serial.begin(115200);
  ArduinoSerial.begin(4800);
}

void loop() 
{
  ArduinoSerial.write('abc');
  delay(100);
}

NudeMCU side:
from machine import 
UART uart = UART(1, 4800) 
uart.init(4800, bits=8, parity=None, stop=1) 
uart.read()

And...it didn't work.


There is UART 0 that is connected to the usb-serial converter and runs the repl.
There is UART 1 that only has a TX pin so I cannot receive data.
OSError: UART(1) can't read
There is UART 2 that doesn't seem to exist in micropython.
ValueError: UART(2) does not exist

So be it...Then we have two choices:
(1) use UART 1 but only sending data from NodeMCU to Arduino -- Test 2
(2) use UART 0 but not use the USB. -- Test 3

Both of the above tests are done using Arduino after flashing program to NodeMCU.

Test 2:


Test 3:


ref:
https://www.arduinoall.com/article/59/nodemcu-esp8266-esp8285-arduino-30-esp8266-nodemcu-%E0%B8%95%E0%B8%B4%E0%B8%94%E0%B8%95%E0%B9%88%E0%B8%AD-arduino-%E0%B9%81%E0%B8%9A%E0%B8%9A-serial
https://www.arduino.cc/en/Reference/SoftwareSerial
https://www.arduino.cc/en/Tutorial/SoftwareSerialExample
https://docs.micropython.org/en/latest/esp8266/library/machine.UART.html?highlight=uart
https://github.com/micropython/micropython/issues/2391
https://github.com/esp8266/Arduino/issues/482

Thursday, 16 November 2017

MicroPython + NodeMCU Getting Started


(0) sudo pip install esptool
(1) esptool.py --port /dev/ttyUSB0 erase_flash

esptool.py v2.1
Connecting....
Detecting chip type... ESP8266
Chip is ESP8266
Uploading stub...
Running stub...
Stub running...
Erasing flash (this may take a while)...
Chip erase completed successfully in 7.8s
Hard resetting...

(2) esptool.py --port /dev/ttyUSB0 --baud 460800 write_flash --flash_size=detect 0 esp8266-20171101-v1.9.3.bin 

esptool.py v2.1
Connecting....
Detecting chip type... ESP8266
Chip is ESP8266
Uploading stub...
Running stub...
Stub running...
Changing baud rate to 460800
Changed.
Configuring flash size...
Auto-detected Flash size: 4MB
Flash params set to 0x0040
Compressed 600888 bytes to 392073...
Wrote 600888 bytes (392073 compressed) at 0x00000000 in 8.9 seconds (effective 542.3 kbit/s)...
Hash of data verified.

Leaving...
Hard resetting...

(3) picocom /dev/ttyUSB0 -b 115200

picocom v1.7

port is        : /dev/ttyUSB0
flowcontrol    : none
baudrate is    : 115200
parity is      : none
databits are   : 8
escape is      : C-a
local echo is  : no
noinit is      : no
noreset is     : no
nolock is      : no
send_cmd is    : sz -vv
receive_cmd is : rz -vv
imap is        : 
omap is        : 
emap is        : crcrlf,delbs,

Terminal ready

////////////////////////////////////////////////
I have to unplug and plug the USB back in. Resetting the device won't work. I got the following error message:

picocom v1.7

port is        : /dev/ttyUSB0
flowcontrol    : none
baudrate is    : 115200
parity is      : none
databits are   : 8
escape is      : C-a
local echo is  : no
noinit is      : no
noreset is     : no
nolock is      : no
send_cmd is    : sz -vv
receive_cmd is : rz -vv
imap is        : 
omap is        : 
emap is        : crcrlf,delbs,


FATAL: cannot open /dev/ttyUSB0: Device or resource busy

This could also be a bad usb cable. Use a good one with a data line on it.


///////////////////////////////////////////////////
///////////////////////////////////////////////////
///////////////////////////////////////////////////
Also you might need to press enter a few times to see the Python prompt:

.......
imap is        : 
omap is        : 
emap is        : crcrlf,delbs,

Terminal ready

>>> 
>>> 
>>> 

(4) Start playing around
Hookup an LED on D7 which is mapped to GPIO13.

>>> import machine
>>> pin = machine.Pin(13, machine.Pin.OUT)
>>> pin.on()
>>> pin.off()

You can see the LED goes on and off now. Happy tinkering!


ref:
https://docs.micropython.org/en/latest/esp8266/esp8266/tutorial/intro.html
https://dev.to/kenwalger/micropython-and-the-nodemcu-esp8266
http://www.instructables.com/id/MicroPython-Basics-Using-NodeMCU-ESP8266/
https://hackaday.com/2016/07/21/micropython-on-the-esp8266-kicking-the-tires/

Wednesday, 15 November 2017

Getting Started with NodeMCU

Many suggest to install different kind of drivers. But I thought would at least see that list in dmesg.
But the first reference woke me up with some similar problems I met.

USE A BETTER/DIFFERENT USB CABLE!!!!

ref:
http://www.esp8266.com/viewtopic.php?f=13&t=4366
https://www.silabs.com/products/development-tools/software/usb-to-uart-bridge-vcp-drivers
https://www.marginallyclever.com/2017/02/setup-nodemcu-drivers-arduino-ide/
https://github.com/nodemcu/nodemcu-devkit/blob/master/Drivers/CH341SER_LINUX.ZIP
http://mohanp.com/nodemcu-esp8266-with-adruino-ide/

Monday, 6 November 2017

System Panic in Particle System (STM32)


particle System Panic reset reason 130

ref:
https://community.particle.io/t/photon-system-panic-hard-fault-task-stack-size/30758
https://community.particle.io/t/core-firmware-sos-panic-codes/4337/5

Monday, 30 October 2017

Manage Startup Applications in Ubuntu

Ubuntu has an GUI called Startup Applications.

ref:
https://linux.cn/article-5943-1.html

Wednesday, 18 October 2017

You really count on using things like GitKraken in the Server? Git itself is powerful enough:

git log --graph --full-history --all --color \
        --pretty=format:"%x1b[31m%h%x09%x1b[32m%d%x1b[0m%x20%s"
ref:
https://stackoverflow.com/questions/1838873/visualizing-branch-topology-in-git